Category: Parts & Accessories

Enhance functionality and prolong the life of your tools and equipment with our quality parts and accessories. Explore today!

  • Best Soldering Iron Tip for Circuit Boards: Reviews

    Best Soldering Iron Tip for Circuit Boards: Reviews

    When it comes to soldering circuit boards, having the appropriate soldering iron tip can make a significant difference in the quality of your work. The right tip ensures efficient heat transfer and precise solder application, minimizing the risk of damaging delicate components. In the following sections, we will discuss best soldering iron tip for circuit boards and the importance of choosing the correct soldering iron tip and provide tips and recommendations to help you find the best one for your needs.

    No Product Name Image Specialty Price
    1 The Hakko T18-B Conical Soldering T Best for beginners Check Price
    2 900M Soldering Iron Tips Budget-friendly Check Price
    3 AiCE Tls 10 PCS Weller ET Replacement Soldering Tips Durable and long-lasting Check Price
    4 Aoyue Chisel Type Soldering Tip Versatile and multipurpose Check Price
    5 Hakko T18-B Conical Soldering Tip High-quality professional option Check Price

    It’s important to note that the categorization of soldering iron tips can vary depending on individual preferences and specific project requirements. It’s recommended to consider factors such as the type of work, skill level, and budget when selecting a soldering iron tip.

    A man working fixing Circuit Boards with Soldering Iron

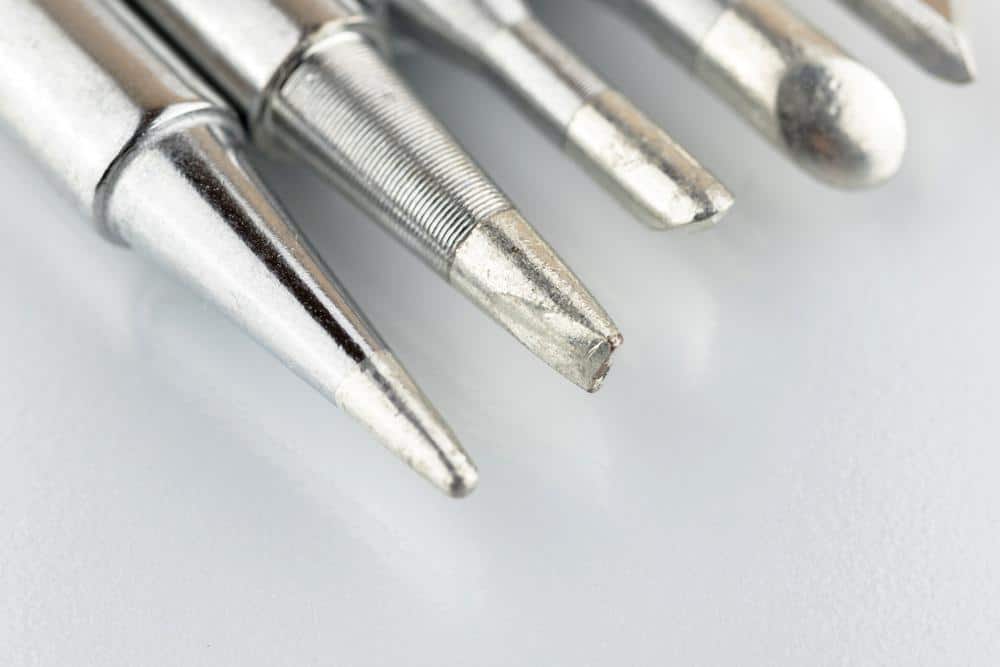
    1. Types of Soldering Iron Tips

    When it comes to soldering, having the right soldering iron tip is essential for achieving precise and clean results, especially when working on delicate circuit boards. There are several types of soldering iron tips available, each designed for specific applications and tasks. Understanding these types can help you choose the best one for your circuit board soldering needs.

    I. Pointed Tips

    • A. Description
      • Pointed tips come to a fine, sharp point and are ideal for detailed work.
    • B. Best Uses
      • Soldering small components on circuit boards.
      • Creating precise solder joints.

    II. Chisel Tips

    • A. Description
      • Chisel tips have a flat, broad shape with a tapered edge.
    • B. Best Uses
      • Efficiently transferring heat to larger soldering areas.
      • Soldering larger components and connectors.

    III. Conical Tips

    • A. Description
      • Conical tips have a cone-shaped profile that tapers to a point.
    • B. Best Uses
      • Versatile for various soldering tasks.
      • Suitable for both fine and broader soldering work.

    IV. Bevel Tips

    • A. Description
      • Bevel tips have a flat, angled surface, making them versatile.
    • B. Best Uses
      • Soldering at angles and corners on circuit boards.
      • Efficiently applying solder to pad areas.

    V. Micro Tips

    • A. Description
      • Micro tips are excellent and delicate.
    • B. Best Uses
      • Soldering minimal and sensitive components.
      • Precision work on miniature circuit boards.

    VI. Hoof Tips

    • A. Description
      • Hoof tips have a rounded shape with a flat surface.
    • B. Best Uses
      • Creating smooth, rounded solder joints.
      • Ideal for drag soldering.

    VII. Blade Tips

    • A. Description
      • Blade tips have a rectangular, blade-like shape.
    • B. Best Uses
      • Precise soldering along straight edges and surfaces.
      • Soldering connectors and flat components.

    Choosing the right soldering iron tip depends on the specific requirements of your circuit board soldering project. Consider the size of components, the level of precision needed, and the overall soldering technique you plan to use to select the most suitable tip for the job.

    2. Factors to Consider When Choosing a Soldering Iron Tip

    Selecting the right soldering iron tip for your circuit board soldering project is a critical decision that can significantly impact the quality of your work. To ensure you make the best choice, consider the following essential factors:

    I. Tip Size and Shape

    • A. Size Matters
      • The size of the tip determines how much heat it can transfer.
      • Smaller tips are suitable for delicate, precision work, while more extensive tips are better for more substantial soldering tasks.
    • B. Shape Considerations
      • The shape of the tip affects your ability to access different soldering areas.
      • Pointed tips are excellent for fine, detailed work, while chisel tips are better for broader connections.

    II. Temperature Control

    • A. Temperature Range
      • Ensure your soldering iron can reach the required temperature for your solder and components.
      • Some tips work better at lower temperatures, while others require higher heat settings.
    • B. Temperature Stability
      • Consistent temperature control is crucial to prevent overheating or underheating.
      • Invest in a soldering iron with reliable temperature regulation.

    III. Material Compatibility

    • A. Matching Materials
      • Consider the materials of both your soldering iron tip and the components you’re working with.
      • Different materials may require specific tip coatings or compositions.
    • B. Preventing Contamination
      • Avoid cross-contamination by using the suitable tip material for your solder type (e.g., lead-free or lead-based).

    IV. Durability and Longevity

    • A. Tip Lifespan
      • Evaluate the expected lifespan of the soldering iron tip.
      • High-quality tips can last longer, saving you money in the long run.
    • B. Ease of Replacement
      • Check how easy it is to replace the tip when it eventually wears out.
      • Some soldering irons offer quick-change systems for convenience.

    V. Ease of Maintenance

    • A. Cleaning
      • Determine how easy it is to clean and maintain the tip.
      • Regular cleaning prevents oxidation and extends the tip’s life.
    • B. Tinning
      • Some tips require periodic tinning to maintain their effectiveness.
      • Understand the tinning process and frequency needed.

    Taking these factors into account when choosing a soldering iron tip will help ensure that you have the right tool for your circuit board soldering needs. A well-matched soldering iron tip can make your soldering tasks more efficient and produce cleaner, more reliable connections.

    3. Best Soldering Iron Tip for Circuit Boards Reviews

    I. 900M Soldering Iron Tips

    900M Soldering Iron Tips

    Recently we tested the 900M Soldering Iron Tips for my soldering station and am extremely pleased with the results. These tips offer excellent compatibility with popular soldering stations, ensuring versatility and ease of use across different brands and models.

    The quality of these soldering iron tips is outstanding. They are made of high-quality materials, such as oxygen-free copper, which provides excellent heat conductivity and resistance. Some variants are even electroplated with iron and nickel, enhancing their durability and resistance to oxidation. This ensures that the tips maintain their performance even after prolonged use.

    The 900M Soldering Iron Tips typically come in multiple tips, offering different shapes and sizes. This variety allows users to select the most suitable tip for their soldering needs. Whether a small, intricate component or a larger joint, these tips provide the flexibility required for precise soldering.

    What impresses me the most is the longevity of these tips. With proper use and maintenance, they can last for thousands of soldering joints. This is a testament to their durability and high-quality construction. I no longer worry about constantly replacing tips, as these soldering iron tips offer a long service life.

    I have experienced exceptional soldering results using these tips on circuit boards. They provide a stable and consistent heat transfer, ensuring clean and reliable solder joints. The versatility and compatibility of these tips make them a valuable addition to any soldering toolkit.

    View More On Amazon

    II. Hakko T18-B Conical Soldering Tip

    Hakko T18-B Conical Soldering Tip

    Hakko T18-B Conical Soldering Tip, which has exceeded my expectations. This soldering tip is a game-changer for anyone involved in circuit board soldering.

    The ‘B’ conical shape of the T18-B tip, measuring R0.5 x 14.5mm, provides unparalleled versatility. Its overall design allows me to approach soldering from any direction, making it incredibly convenient and efficient. Whether you’re a beginner or an experienced soldering professional, this tip is an excellent choice for all soldering tasks.

    The quality of the Hakko T18-B is outstanding, as expected from Japanese craftsmanship. It fits perfectly with my Hakko FX-8801 soldering iron, offering a seamless connection that ensures optimal heat transfer. The precision and accuracy achieved with this combination are truly remarkable.

    I primarily use the T18-B for circuit board soldering, which has proven to be the best soldering iron tip I have ever used. It effortlessly solders delicate components without causing any damage or heat-related issues. I have noticed a significant reduction in soldering errors and improved overall workmanship.

    Furthermore, the T18-B is compatible with other Hakko soldering irons, such as the FX-8803 and FX-8805, as well as soldering stations like the FX-888D, FX-889, FR-701, and FR-702. This compatibility ensures its usability across various setups, making it a versatile choice for soldering professionals.

    View More On Amazon

    III. Hakko T18-B Conical Soldering Tip

    Hakko T18-B Conical Soldering Tip

    We tested the FEITA Soldering Iron Tips T15 SMD Solder Tip for HAKKO Soldering Station FX-951/952, and I’m ecstatic about the results. These tips are lead-free, environmentally friendly, and conform to the ROHS standard with less than 0.1% wt lead content. The technical indicators meet the original standards, and they operate under 400 degrees Celsius (±20 degrees), lasting for 50,000 solder joints.

    The tips are made from imported copper oxide and undergo precise molding, resulting in accurate sizing. Compared to domestic products, their lifespan is 3-4 times longer due to the lead-free alloy iron electric plating. Even under high temperatures, the tips don’t turn black, thanks to special surface handling and coating processing.

    I’m amazed by the performance of these tips. They excel in tin-on and tin melting, providing uniform and fluent soldering. They deliver top-notch quality with high anti-oxidation, good moist performance, and quick thermal conductivity. Additionally, their lead-free and environmentally friendly nature gives me peace of mind. I can trust these tips for various soldering tasks without compromising safety.

    The FEITA T15 SMD Soldering Iron Tips have surpassed my expectations. Their durability, precision, and adherence to environmental standards make them the best soldering iron tips I’ve used. I highly recommend them to anyone seeking reliable and high-quality soldering results.

    View More On Amazon

    IV. AiCE Tls 10 PCS Weller ET Replacement Soldering Tips

    AiCE Tls 10 PCS Weller ET Replacement Soldering Tips

    With the performance of AiCE Tls 10 PCS Weller ET Replacement Soldering Tips, I couldn’t be happier with the results. This China-made brand has impressed me with its rapid temperature recovery and ability to hold temperature stable during soldering tasks.

    The set includes 10 different tips, providing a variety of shapes to meet different soldering needs. It features 1 bent conical tip, 4 screwdriver tips, 1 long screwdriver tip, 1 narrow screwdriver, 1 conical tip, 1 long conical tip, and 1 knife tip. The inclusion of a bent tip specifically for drag soldering on various projects is a standout feature for me.

    These soldering tips are versatile and suitable for a wide range of applications. Whether it’s working on precision electronics, drag soldering, DIP chips, narrow tip tasks, LED and board wiring, or Raspberry Pi Zero projects, these tips deliver excellent performance.

    One of the key highlights of these tips is their precision. They enable accurate soldering on intricate circuit boards and delicate components. The screwdriver tips are particularly useful for applications that require a broader contact surface.

    I have found that these soldering tips provide quick heat transfer and maintain a stable temperature, ensuring consistent and reliable soldering results. The build quality is impressive, and the tips are durable, lasting through numerous soldering projects.

    View More On Amazon

    V. Aoyue Chisel Type Soldering Tip T-1.6D

    Aoyue Chisel Type Soldering Tip T-1.6D

    I am thrilled with the results of Aoyue Chisel Type Soldering Tip T-1.6D. This soldering tip offers great convenience and versatility for circuit board soldering.

    The approximate outside diameter of the barrel is 6.4mm, with an inner diameter of approximately 4.2mm. This size provides a good balance between precision and effective heat transfer. The chisel shape of the tip is ideal for various soldering tasks, allowing for precise control and a wide contact surface.

    The best features of this soldering tip is its easily replaceable solder tip cartridges. The tip cartridge can be pulled out of the soldering iron after unscrewing the connection, allowing quick and effortless changes between different tips. This feature is highly convenient, especially when working on various projects or when specific soldering tasks require different tip shapes or sizes.

    The Aoyue Chisel Type Soldering Tip T-1.6D offers convenience and ensures reliable performance. The tip delivers efficient heat transfer and maintains a stable temperature during soldering. This results in consistent and high-quality solder joints on circuit boards.

    I appreciate the build quality of this soldering tip. It is durable and designed to withstand frequent use, making it a reliable tool for any soldering project. The replaceable cartridge system ensures I can easily switch out the tip when necessary without requiring complex disassembly or additional tools.

    View More On Amazon
    Soldering iron Tip

    4. Proper Soldering Techniques for Circuit Boards

    Soldering circuit boards demands precision and skill to ensure reliable connections without damaging sensitive components. To achieve successful soldering, it’s essential to follow proper techniques. Below, we outline the steps and tips for mastering soldering on circuit boards.

    I. Preparing the Circuit Board

    • A. Cleaning and Inspection
      • Begin by cleaning the circuit board to remove any dust, debris, or contaminants.
      • Inspect the board for damaged or loose components that may need repair before soldering.
    • B. Secure Components
      • Ensure all components are correctly placed and secured in their designated positions.
      • Use a helping hand or clamp to hold components in place during soldering.

    II. Preparing the Soldering Iron

    • A. Temperature Settings
      • Set the soldering iron to the appropriate temperature for your solder and components.
      • Allow it to reach the desired temperature for consistent results.
    • B. Tinning the Tip (H2)
      • Apply a small amount of solder to the tip of the iron to “tin” it.
      • Tinning helps with heat transfer and improves solder flow.

    III. Soldering Components

    • A. Heat Transfer
      • Gently touch the soldering iron tip to both the component lead and the pad on the circuit board.
      • Allow a moment for heat to transfer evenly.
    • B. Apply Solder
      • Apply a small amount of solder to the joint, ensuring it touches both the lead and the pad.
      • Maintain a steady hand to create a clean, even solder joint.
    • C. Avoid Excess Solder
      • Be cautious not to over-solder, which can lead to solder bridges or excess solder blobs.
      • Use a solder wick or a solder sucker to remove excess solder if needed.
    • D. Inspect Joints
      • After soldering, visually inspect each joint for irregularities, such as cold joints or incomplete connections.
      • Reheat and reflow any problematic joints as necessary.

    IV. Avoiding Common Mistakes

    • A. Overheating Components
      • Minimize the time the soldering iron is in contact with components to prevent damage.
      • Use heat sinks if necessary to protect sensitive parts.
    • B. Solder Bridges
      • Avoid creating unintentional connections between adjacent pads or leads.
      • Use flux to prevent solder from flowing where it shouldn’t.

    V. Cleanup and Finishing

    • A. Cleaning Residue
      • Remove any flux residue or excess solder carefully using isopropyl alcohol and a brush.
      • Ensure the circuit board is clean and free of contaminants.

    VI. Practice and Patience

    Mastering soldering techniques for circuit boards takes practice and patience. Start with less critical projects to build your skills and confidence. Over time, you’ll become adept at creating reliable solder connections while safeguarding delicate components.

    Soldering Iron Tip

    5. Maintenance and Care Tips for Soldering Iron Tips

    Maintaining and caring for your soldering iron tip is essential for ensuring its longevity and performance, especially when working on delicate circuit boards. Proper maintenance practices can extend the life of your soldering iron tip and help you achieve clean and precise solder joints. Here are some valuable tips for taking care of your soldering iron tip:

    I. Cleaning and Re-Tinning

    • A. Regular Cleaning
      • After each use, clean the soldering iron tip with a brass wire sponge or damp sponge.
      • Remove any residual solder and flux residue to prevent oxidation.
    • B. Re-Tinning
      • Periodically re-tin the soldering iron tip by applying a thin layer of solder to it.
      • Re-tinning helps maintain the tip’s thermal efficiency and prevents oxidation.

    II. Storage and Handling

    • A. Proper Storage
      • Store your soldering iron in a dry and clean environment to prevent moisture and corrosion.
      • Use a dedicated holder or stand to keep the tip elevated when not in use.
    • B. Avoiding Excessive Heat
      • Avoid leaving the soldering iron at high temperatures for extended periods when not in use.
      • Please turn it off or reduce the temperature when taking breaks to prevent tip damage.

    III. Avoiding Mechanical Stress

    • A. Gentle Handling
      • Handle the soldering iron with care to avoid dropping it or subjecting it to mechanical stress.
      • Protect the tip from accidental impacts that could cause damage.
    • B. Avoid Abrasive Surfaces
      • Don’t touch the soldering iron tip to abrasive surfaces, as this can wear down the tip.
      • Use a designated cleaning sponge or brass sponge for tip cleaning.

    IV. Using Quality Solder and Flux

    • A. Quality Solder
      • Choose high-quality solder with the appropriate composition for your work.
      • Low-quality solder can leave residues that affect tip performance.
    • B. Flux Considerations
      • Use flux when necessary to improve solder flow and prevent oxidation.
      • Be mindful of the type of flux used, as some may require more thorough cleaning.

    V. Regular Inspection

    • A. Tip Condition
      • Periodically inspect the soldering iron tip for signs of wear, corrosion, or oxidation.
      • Replace the tip if it shows significant damage.
    • B. Component Sensitivity
      • Be aware of the components you’re soldering, especially if they are sensitive to heat.
      • Adjust your soldering technique accordingly to minimize stress on components.

    By following these maintenance and care tips, you can ensure that your soldering iron tip remains in optimal condition, allowing you to achieve precise and reliable soldering on circuit boards and other electronic projects. Proper care of your tools is an essential aspect of quality workmanship in electronics.

    6. Troubleshooting Soldering Issues

    Soldering on circuit boards can sometimes be challenging, and even experienced individuals may encounter issues. Troubleshooting soldering problems is a crucial skill that ensures the quality and reliability of your electronic assemblies. Below, we’ll explore common soldering issues and how to address them effectively.

    I. Cold Joints

    • A. Symptoms
      • Dull or grainy solder joints.
      • Lack of adhesion to both the component lead and the pad.
    • B. Causes
      • Need for more heat or contact time.
      • Contaminated surfaces or inadequate flux.
    • C. Solution
      • Reheat the joint and ensure proper heat transfer.
      • Apply additional solder and flux if needed to create a smooth, shiny joint.

    II. Solder Bridges

    • A. Symptoms
      • Unintended connections between adjacent pads or leads.
      • Visible solder linking components.
    • B. Causes
      • Excessive solder applied or solder not properly wicked away.
      • Inadequate spacing between components.
    • C. Solution
      • Use a solder wick or a solder sucker to remove excess solder and bridges.
      • Ensure proper component spacing to prevent future bridges.

    III. Overheating Components

    • A. Symptoms
      • Damage or discoloration of sensitive components.
      • Component malfunction or failure.
    • B. Causes
      • Excessive heat is applied for an extended period.
      • Inadequate use of heat sinks or heat shielding.
    • C. Solution
      • Use heat sinks or heat shields to protect sensitive components.
      • Practice quicker soldering techniques to minimize heat exposure.

    IV. Incomplete Solder Joints

    • A. Symptoms
      • Solder joints appear partially formed or lack adhesion.
      • Components may not be securely attached.
    • B. Causes
      • Insufficient solder applied or poor heat transfer.
      • Contaminated surfaces or inadequate flux.
    • C. Solution
      • Reheat the joint, ensuring proper heat transfer for complete soldering.
      • Apply additional solder and flux as needed to create a reliable connection.

    V. Insufficient Flux

    • A. Symptoms
      • Solder does not flow smoothly or forms irregular shapes.
      • Increased difficulty in soldering.
    • B. Causes
      • Insufficient or expired flux on the solder or the components.
      • Flux residue needs to be adequately cleaned.
    • C. Solution
      • Apply fresh flux to the joint to improve solder flow.
      • Ensure thorough cleaning of flux residues after soldering.

    Troubleshooting soldering issues is an integral part of the soldering process. By identifying and addressing these common problems, you can enhance the quality of your solder joints and ensure the reliability of your circuit board assemblies. Practice and experience are vital to becoming proficient in troubleshooting and achieving consistent, high-quality soldering results.

    7. Safety Considerations

    When it comes to soldering on circuit boards, ensuring safety is paramount. Soldering involves high temperatures and potentially harmful substances, so taking the necessary precautions is essential. Here are some safety considerations to keep in mind:

    I. Soldering Safety Precautions

    • A. Eye Protection
      • Always wear safety goggles or glasses to protect your eyes from hot solder and debris.
    • B. Ventilation
      • Work in a well-ventilated area or use a fume extractor to prevent inhaling solder fumes.
    • C. Heat Protection
      • Wear heat-resistant gloves to protect your hands from burns.
    • D. Fire Safety
      • Have a fire extinguisher nearby, especially when soldering near flammable materials.

    II. Proper Ventilation

    • A. Fume Extraction
      • Use a fume extractor or soldering station with built-in ventilation to remove harmful fumes from the workspace.
    • B. Avoiding Inhaling Fumes
      • Position your face away from the soldering fumes and ensure good airflow.

    III. ESD Protection

    • A. ESD-Safe Workspace
      • Create an electrostatic discharge (ESD)-safe workspace to prevent damage to sensitive components.
    • B. ESD Wrist Strap
      • Wear an ESD wrist strap to discharge static electricity before touching electronic components.

    IV. Proper Handling of Solder

    • A. Lead-Free Solder
      • If using lead-free solder, be aware of the potential health hazards and handle it with care.
    • B. Wash Hands
      • Wash your hands thoroughly after handling solder to avoid ingesting any lead residues.

    V. Equipment Safety

    • A. Soldering Iron Safety
      • Use a soldering iron with proper safety features, such as a heat-resistant handle and a stable stand.
    • B. Cord Safety
      • Ensure that the soldering iron’s power cord is in good condition and not damaged.
    • C. Unplug When Not in Use
      • Always unplug the soldering iron when it’s not in use to prevent accidents.

    VI. Work Surface

    • A. Heat-Resistant Surface
      • Use a heat-resistant work surface or soldering mat to protect your workspace from heat damage.
    • B. Organization
      • Keep your workspace organized to prevent accidents and maintain a clear area for soldering.

    Taking these safety considerations seriously is crucial when soldering on circuit boards. By following safety protocols, you can protect yourself, your workspace, and the electronic components you’re working on, ensuring a safe and successful soldering experience.

    8. FAQs (Frequently Asked Questions)

    QI: How do I choose the correct soldering iron tip size for circuit board work?

    AI: The size of the soldering iron tip depends on the components you are working with. Smaller tips are suitable for fine-pitch parts, while larger tips are more suitable for larger soldering jobs that require more heat.

    QII: Can I use any soldering iron tip with my soldering iron?

    AII: Not all soldering iron tips are compatible with every soldering iron. It’s important to check the documentation or manufacturer’s guidelines for your soldering iron to identify the types of compatible tips.

    QIII: What is the benefit of using a temperature-controlled soldering iron?

    AIII: Temperature-controlled soldering irons allow you to adjust the heat output according to the requirements of your soldering task. This helps minimize the risk of overheating or damaging sensitive components.

    QIV: How should I maintain my soldering iron tip?

    AIV: To maintain your soldering iron tip, treat it as hot, even when not in use, to prevent oxidation. Avoid applying excessive pressure, and clean the tip regularly by wiping it with a damp sponge.

    9. Conclusion

    In conclusion Best Soldering Iron Tip For Circuit Boards, Choosing the best soldering iron tip for circuit boards is essential for achieving precise, reliable, and efficient soldering results. By considering the tip’s compatibility, style, size, and temperature control, you can enhance your soldering experience and ensure successful circuit board work. Remember to follow the recommended tips for using soldering iron tips and explore the recommended options based on your specific requirements.

  • Best Garage Door Opener with Camera: Reviews, Guide

    Best Garage Door Opener with Camera: Reviews, Guide

    Garage door openers with cameras have become increasingly popular in recent years. They offer homeowners a convenient way to monitor their garage and ensure the safety and security of their property. This article will discuss the best garage door opener with camera and the importance of having a garage door opener with a camera and provide a brief history of this technology.

    Having a garage door opener with a camera is essential for many reasons. It allows homeowners to see who is entering and leaving their garage. It provides a level of security unmatched by traditional garage door openers. With the ability to view live or recorded footage from anywhere, homeowners can keep an eye on their property even when they’re away.

    The concept of a garage door opener with a camera is familiar and has been around for several years. However, early versions were often expensive and difficult to install. As technology advances, these devices have become more affordable and user-friendly, making them accessible to a wider audience.

    No Product Name Image Specialty Price
    1 Chamberlain B6753T Smart Garage Door Opener Best Overall Check Price
    2 Momentum NIRO WiFi Garage Door Opener. Best Budget Check Price
    3 ecobee SmartCamera – Indoor WiFi Security Camera Best for Beginners Check Price
    4 Zmodo Torch 360 Smart Home Garden Door Light Wireless Camera Best Outdoor Camera Check Price
    5 Chamberlain B4643T Smart Built-in Camera-myQ Smartphone Controlled Best Garage Camera Check Price
    garage door pvc hand use remote

    Exploring the Reasons Why One Would Want a Garage Door Opener with a Camera

    Garage door openers have come a long way from just being simple devices that do nothing more than lift your garage door. Nowadays, they’re all about adding convenience and security to your life, and what better way to do that than by including a camera? Below are some compelling reasons why a garage door opener with a camera should be on your must-have list.

    Enhanced Security

    Let’s face it: we all want to keep our homes—and, by extension, our garages—safe. A camera-equipped garage door opener does just that. You can see who’s coming and going and even get alerts sent to your phone for any unusual activity. It’s like having a security guard who never takes a coffee break.

    Monitoring Capabilities

    Have you ever had that sinking feeling of wondering whether you closed the garage door? With a camera, you can quickly check right from your phone. Some systems even offer two-way communication, so you can tell the delivery person where to leave a package.

    Smart Home Synergy

    Many garage door openers with cameras can seamlessly integrate into your existing smart home system. That means you can control your garage door, check the camera feed, and even turn off the lights in your garage—all from a single app. Talk about taking control of your domain!

    Convenience

    We all love conveniences that make our lives easier. The remote capabilities of modern garage door openers allow you to open or close your garage door from anywhere, as long as you have an internet connection. So, if you’re halfway to the office and can’t remember if you closed the garage door, a simple tap on your smartphone can give you peace of mind.

    Family Safety

    Suppose you have teenagers who like to sneak out or want to ensure your younger kids aren’t playing too close to the garage door. In that case, a camera adds an extra layer of family safety. You can set up notifications to alert you when the garage door opens and closes, so you’re always in the know.

    Visual Record

    A camera provides a visual log of activity. Should anything go missing from your garage or if there is a break-in, you’ve got video evidence to help identify the culprit.

    Versatility

    Some advanced systems offer features like night vision and even thermal imaging. That’s pretty handy if you’re worried about nocturnal critters—or intruders—lurking around your garage.

    In summary, a garage door opener with a camera isn’t just a fancy gadget; it’s a multi-functional tool that adds convenience, security, and peace of mind to your daily life. With features that cater to modern needs, it’s clear why these devices are growing in popularity. So why settle for basic when you can have a garage door opener that offers so much more?

    Features to Look For: Highlighting key features.

    Let’s get down to brass tacks and talk about the key features you should have on your radar when hunting for a garage door opener with a camera.

    Video Quality

    The last thing you want is grainy, unclear video. Look for garage door openers with high-definition cameras, preferably 1080p or higher. Some even offer 4K resolution. That way, you can clearly see who or what is near your garage.

    Real-time Streaming

    Your camera should offer real-time streaming so you can check in anytime, anywhere. This feature is a godsend, especially when you’re away and need to monitor your home’s security.

    Motion Detection

    This is a nifty feature that alerts you when there’s movement near your garage door. It’s like having a sixth sense that lets you know something’s afoot, even when you’re not around to see it.

    Night Vision

    Let’s pay attention to this one; your camera should work well in low-light conditions. A garage door opener camera with night vision ensures that you can keep an eye on your property 24/7.

    Two-way Audio

    Some models offer two-way audio, allowing you not just to listen but also to speak to anyone near your garage. This is particularly useful for communicating with delivery people or even scaring off potential intruders.

    Cloud Storage and Local Storage

    Storage options are crucial. Some garage door openers offer free cloud storage for a certain period, while others may require a subscription. Alternatively, some models also offer local storage through an SD card.

    Wi-Fi Connectivity

    To take full advantage of your camera and other smart features, your garage door opener should easily connect to your home Wi-Fi. This ensures seamless control and monitoring via your smartphone.

    Weather Resistance

    Garages are only sometimes the most climate-controlled environments. Make sure the camera on your garage door opener can withstand various weather conditions, from extreme cold to high heat.

    Battery Backup

    In case of power outages, a battery backup ensures that your garage door opener and its camera continue to operate. This is essential for maintaining security at all times.

    User-friendly App

    A complex, hard-to-navigate app can turn your smart garage door opener into a source of frustration. Opt for models that come with intuitive, user-friendly apps.

    Smart Home Integration

    Last but not least, if you’re already invested in a smart home ecosystem like Google Home, Apple HomeKit, or Amazon Alexa, check for compatibility. It’s much more convenient to control multiple devices from a single platform.

    So there you have it—key features to keep in mind as you embark on the journey to find the best garage door opener with a camera.

    Types of Garage Door Openers with Camera

    There are different kinds of garage door openers with cams to choose from. Each type has its perks and features, so it’s important to consider what you need before buying. Here, we’ll talk about the three main kinds of garage door openers with cameras: those placed on the wall, ceiling, and side.

    I. Wall-Mounted Garage Door Opener with Camera

    If your roof is small, a wall-mounted garage door opener with a camera is a great choice. This garage door opener is attached to the wall next to the door, making it perfect for garages with low ceilings. Wall-mounted openers with cams are also easy to set up and can be used with most garage doors. They have features like online access, motion recognition, and automatic recording, which makes them a great addition to any home security system.

    II. Ceiling-Mounted Garage Door Opener with Camera

    The most popular garage door opener with a camera is placed on the ceiling. These openers are attached to the garage door and put on the garage’s ceiling. Garages with high ceilings are the best places for openers, with cameras on the roof. These openers have remote access, motion detection, and automatic recording features. They also work with most garage doors and are pretty easy to set up.

    III. Side-Mounted Garage Door Opener with Camera

    Side-mounted garage door openers with cams are fairly new to the market. This type of garage door opener is put on the side of the door. This makes it a great choice for people who want to save room on the roof. Side-mounted garage door openers with cams have features like online access, motion recognition, and automatic recording. They are also easy to set up and work with most garage doors.

    4: Top Garage Door Openers with Camera

    I. ecobee SmartCamera – Indoor WiFi Security Camera, Smart Home Security System

    ecobee SmartCamera – Indoor WiFi Security Camera

    The SmartCamera is a high-tech security camera with a lot of great features. With its HD video and night vision, users can send 1080p HD video to their phones at any time of day or night. The camera also has a feature called “person detection,” which lets it know when a person is in the frame and pans across its 180o field of view to keep them in the middle of the picture. This function lets users know if anyone is in their home, making them feel safer and giving them more peace of mind.

    The SmartCamera can also identify smoke alarms, an important safety tool for every home. The camera sends a message to the user’s phone if it hears anything from their smoke alarm. This lets them take the necessary steps to keep their family safe. The SmartCamera also cares about the safety of its users. It has on-device processing and security from beginning to end. It can turn off immediately when family members come home, keeping users’ privacy safe.

    Lastly, the SmartCam works with Ecobee smart security, which makes it more useful and secure overall. The clever protection system ensures users’ homes and families are safe, even when they aren’t there. Overall, the SmartCamera is a great security camera for people who want to keep their homes and families safe. It has high-tech features that are easy to use and reliable.

    View More On Amazon

    II. Chamberlain B6753T Smart Garage Door Opener

    Chamberlain B6753T Smart Garage Door Opener

    The myQ Smart Garage Door Opener is a new technology that makes garages safer and more useful. With its built-in camera, the myQ app lets users see and hear what’s happening in their garage. The 1300 wide-angle camera lets users see the whole garage, making them feel safer and more at ease.

    Also, the myQ app lets users access, lock, and check on their garages from anywhere, at any time, using their smartphones. Users can easily download and connect the app to their garage door opener, making it a useful and easy-to-use device. The garage door opener also has a built-in LED lighting system that lights up every part of the garage similarly. The lighting is triggered by motion and has a brightness of 2,000 lumens so that users can see well in their garages.

    The garage door opener also has a battery backup that lets people open and close the door even if the power goes out. The ultra-quiet DC motor and soft start/stop make a living near the garage easy. The device also has a two-way radio system that lets people talk between their garage and smartphone in real-time.

    Overall, the myQ Smart Garage Door Opener is a reliable and innovative tool that makes garages safer and more convenient for users. It’s easy to set up, has advanced features, and gives people real-time access to and controls their garage, so any homeowner should consider buying one.

    View More On Amazon

    III. Chamberlain B4643T, Blue Garage Door Opener

    Chamberlain B4643T, Blue Garage Door Opener

    The myQ Smart Garage Door Opener is an innovative gadget with high-tech features that make the garage safer and more convenient. Through the myQ app, users can see and hear what’s happening in their garage thanks to the built-in camera’s 1400 wide-angle lens. This feature gives people an extra layer of security. It lets them get into their garage in real time from anywhere using their smartphone.

    The myQ app lets people control, lock, and monitor their garage from anywhere. The app is easy to download and set up. It lets users connect their new garage door opener and control it easily from their phones.

    The device also has smart LED lighting that lights up parts of the garage that get much use. The lighting is triggered by motion and has 1,000 watts, giving people enough light to see and feel safe.

    With an ultra-quiet DC motor and soft start/stop, the myQ Smart Garage Door Opener ensures that living areas near the garage are comfortable. The device also has a better Wi-Fi connection and memory to support new myQ features and solutions. This makes it a reliable and modern garage door opener.

    Overall, the myQ Smart Garage Door Opener is a great tool for making your garage safer and easier to use. It is easy to use, has advanced features, and can be controlled and accessed in real-time through myQ app. Anyone who wants a reliable and easy-to-use garage door opener should buy this gadget.

    View More On Amazon

    IV. Zmodo Torch 360 Smart Home Garden Door Light Wireless Camera

    Zmodo Torch 360 Smart Home Garden Door Light Wireless Camera

    The Zmodo Torch 360 is a smart light bulb set to one of the millions of colors, giving your home a comfortable and unique atmosphere. With its wide viewing range and remote controls, you can easily pan and see a full 360° view of your entry wall, patio area, or pathway pillar. The remote-watching feature of the Torch 360 lets you check in on your home and property from anywhere using our desktop web app or the free Zmodo app for iOS and Android.

    The Torch 360 lets you watch HD videos, and its cloud recording plans let you save video footage around the clock and edit it to make clips. The device is easy to set up. Just change your current light bulb with the Zmodo Torch and follow the steps in the Zmodo app to connect it to your home’s WiFi.

    The Torch 360 is bigger than a regular light bulb (2.95″ x 6.46″) and works best in a clear glass case. Even though it doesn’t have infrared night vision, it can still show video based on the light around it. It is, however, less sensitive than the human eye.

    Overall, the Zmodo Torch 360 is a great smart home device for anyone who wants to make their home safer and more convenient. The Torch 360 is a great purchase for anyone who wants to improve their home lighting and security system. It is easy to set up, record HD video, and watch it from afar.

    View More On Amazon

    V. Momentum NIRO Wi-Fi Garage Door Opener with Camera and Smartphone Control

    Momentum NIRO Wi-Fi Garage Door Opener with Camera and Smartphone Control

    The Momentum Smart Garage Controller is a simple device that lets you use your smartphone to control your garage door from anywhere. With the Momentum app, you can open and close your garage door and watch live HD video feeds of your home. The built-in camera has a 110-degree viewing angle to simultaneously see much of your home. The camera also has smart motion recognition and infrared night vision, so you can always keep your home safe and secure.

    The 2-way audio on the Momentum Smart Garage Controller is one of its best features. With the built-in microphone and speaker, you can listen to and talk to anyone in your garage. This function is especially helpful when you are away from home and want to keep in touch with family and friends.

    When the camera notices motion or sound, the Momentum app sends quick tips and messages to your phone or computer. This way, you’ll always know what’s happening in and around your home. The device is easy to set up and works with most garage door openers made after 1993. However, it does not work with openers that have Security 2.0+ or MyQ technology. Suppose you want to add smart features to your garage door opener. In that case, the Momentum Smart Garage Controller is a great choice.

    View More On Amazon

    VI. OCCHI Smart Garage Door Opener Remote, Garage Camera

    OCCHI Smart Garage Door Opener Remote

    The OCCHI Smart Garage Camera is a useful device that allows you to monitor your garage and control your garage door from anywhere. It can be integrated with your garage opener, making it a smart device. You can watch a live feed of your garage and control the door remotely for safety and peace of mind. The device can also be operated through Alexa voice commands, making it convenient for users.

    The key feature of the OCCHI Smart Garage Camera is that it notifies you if the garage door is left open. This important safety feature can prevent break-ins and protect your belongings. The device can also be scheduled to automatically close at a specific time each day, providing an additional layer of security. Additionally, the camera provides push notifications in real-time whenever the garage door is opened or closed.

    The OCCHI Smart Garage Camera is compatible with Security+ 2.0 openers and over 50 branded openers manufactured after 1993. It is also UL325 safety requirements compliant, ensuring its safety and reliability. The device features full-duplex 2-way audio communication, enabling natural conversation. It records footage constantly and stores it on a MicroSD card (8G – 256G, not included), ensuring you never miss an important moment.

    View More On Amazon
    garage door installation repair home contractor

    Installation Guide: A brief overview of what installing one entails

    So you’ve picked out your swanky new garage door opener with a camera, and it’s ready to be installed. You’re probably wondering, “What’s the installation process like, and should I go the DIY route or call in the pros?” Well, you’ve come to the right place to find those answers!

    DIY Installation

    What it Entails:
    • Unboxing and Checking Components: Make sure all parts are included as per the instruction manual.
    • Removing the Old Opener: If you’re replacing an existing opener, you’ll need to remove it first.
    • Assembling the New Opener: Follow the manual to assemble the garage door opener.
    • Mounting: Attach the opener to the ceiling of your garage.
    • Camera Setup: This involves setting up the camera and connecting it to your Wi-Fi network.
    • Testing: Make sure everything is in working order, from the opening mechanism to the camera.

    If you’re keen on taking the DIY route for installing your new garage door opener with a camera, don’t miss our in-depth guide on DIY Installation of Garage Door Opener with Camera. It’s chock-full of step-by-step instructions and expert tips that’ll make the process a breeze!

    Pros:
    • Cost-Effective: You save on installation fees.
    • Learning Experience: You get to learn the ins and outs of your new device.
    • Instant Gratification: No need to schedule with a professional. You can install it whenever you like.
    Cons:
    • Time-Consuming: It could take a good chunk of your day.
    • Risk of Errors: One small mistake could lead to functionality issues or even void your warranty.
    • Physical Labor: It requires some lifting and maneuvering, so you’ll need to be up for the challenge.

    Professional Installation

    What it Entails:
    • Scheduling: Set up a time for the installer to come.
    • Inspection: The professional may inspect your garage to ensure compatibility.
    • Installation: The installer will handle all aspects, from removing your old opener (if necessary) to installing and setting up your new one.
    • Tutorial: Most professionals will give you a quick run-through on how to operate your new device.
    Pros:
    • Hassle-Free: You sit back and relax.
    • Expertise: They know what they’re doing, reducing the risk of errors.
    • Speed: A professional can usually get it done faster than you can say “garage door opener.”
    Cons:
    • Cost: Professional services come with a fee.
    • Scheduling: You’ll need to find a time that works for both you and the installer.
    • Less Personal Familiarity: Since you didn’t install it yourself, you might need to be more familiar with how everything works.

    So there you have it—a quick look at what installing a garage door opener with a camera entails, along with the pros and cons of going DIY or hiring a pro. Either way, once it’s up and running, you’re going to enjoy the blend of convenience and security that comes with it!

    Maintenance Tips: Keeping the device in tip-top shape.

    All right, so you’ve invested and installed that slick garage door opener, complete with a camera. Now comes the crucial part—maintenance. Yep, just like your car or any other piece of machinery, your garage door opener needs regular TLC to keep it running smoothly. So, let’s dive into the nitty-gritty of keeping that bad boy in tip-top shape.

    Regular Cleaning

    Camera Lens

    Keep that lens clean! A dirty lens can compromise the video quality. Use a microfiber cloth to wipe away any dust or grime gently.

    Sensors and Motion Detectors

    Sensors can collect dust, which might result in false alarms or inefficiencies. Clean them using a soft, dry cloth.

    Lubrication

    Door Tracks and Chains

    A little lubrication goes a long way in ensuring the smooth operation of your garage door opener. Use a silicone-based lubricant for best results.

    Firmware and Software Updates

    Pay attention to those update notifications for your device’s app or firmware. Manufacturers often release updates to fix bugs or enhance performance.

    Check the Battery Backup

    You don’t want to discover your battery backup is dead when you most need it. Test it periodically by unplugging the main unit and seeing if the backup kicks in.

    Inspect the Wiring

    Look for any loose connections or frayed wires. If you spot anything out of the ordinary, call in a professional for repairs.

    Recalibration

    Your opener’s settings can go out of whack due to regular wear and tear or after a software update. Check your manual for recalibration instructions.

    Scheduled Professional Check-ups

    Even if everything seems fine, it’s a good idea to have a professional give your system a once-over at least once a year.

    Reset and Reconfigure After Power Outages

    After a power outage, some settings might revert to their defaults. Make sure to check your custom configurations and reapply them if needed.

    Keeping Spare Parts

    It’s always wise to have a set of spare parts like extra bulbs or sensors. You never know when you might need them.

    Test Your System Regularly

    Make it a habit to test your garage door opener and camera at regular intervals. Better safe than sorry, right?

    Maintain a Log

    Keep a maintenance log for reference. Note down each cleaning session, lubrication, and software update. This could be invaluable for troubleshooting down the road.

    Review User Feedback

    Keep an eye on community forums or social media groups related to your product. You can often pick up maintenance tips and tricks from other users.

    So there you go! Regular maintenance isn’t just about ensuring longevity; it’s also crucial for the optimal functionality of both the opener and the camera. By keeping your system well-maintained, you ensure that it serves you well for years to come. Happy maintaining!

    Are you looking to add an extra layer of insulation to your garage? Take advantage of our comprehensive guide on How To Cover Garage Door from Inside: Transform Your Garage. We delve into the nitty-gritty of different materials and methods to keep your space cozy year-round. Check it out now!

    Common Problems and Their Solutions

    Despite regular maintenance, garage door openers with cameras may still need fixing. Here are some common problems and their solutions:

    • Door Does Not Open or Close If the door does not open or close, check the power source and ensure the opener is connected to power. Also, check the batteries in the remote and replace them if necessary. Suppose other steps solve the problem. In that case, it may malfunction with the opener itself, and professional help may be required.
    • Noisy Operation If the garage door opener is making excessive noise, it may be due to worn or damaged parts. Lubricating the moving parts may help reduce the noise. However, if the noise persists, it may be necessary to replace the damaged parts.
    • Camera Malfunction If the camera is not functioning properly, check the wiring and ensure it is connected properly. If the wiring is not the issue, it may malfunction with the camera, and professional help may be required.

    Frequently Asked Questions (FAQs)

    Cost of Garage Door Openers With Camera

    The cost of garage door openers with cameras can vary depending on several factors, such as the brand, type, and features. Some factors that affect these openers’ cost include camera quality, night vision capability, field of view, smart features, and compatibility with existing home automation systems.

    The price range of garage door openers with cameras can vary. Wall-mounted garage door openers with cameras can range from $150 to $350. In contrast, ceiling-mounted and side-mounted garage door openers with cameras can range from $200 to $500.

    Warranty and Customer Support

    Warranty information and customer support can vary by manufacturer. It is important to research the warranty information and customer support each manufacturer offers before purchasing a garage door opener with a camera. Some manufacturers offer a limited warranty, while others offer a more comprehensive warranty. Customer support can also vary, with some manufacturers offering more extensive support options than others.

    Security Concerns of Garage Door Openers With Camera

    One potential security concern with garage door openers with cameras is the risk of hacking. Choosing a garage door opener with a camera with strong security features is important to prevent hacking. This may include encryption, two-factor authentication, and secure Wi-Fi connections.

    Measures to ensure security can also include setting strong passwords, regularly updating the firmware, and avoiding connecting the garage door opener with a camera to public Wi-Fi networks.

    Conclusion

    In conclusion, Best Garage Door Opener with Camera, a garage door opener with a camera is an essential tool for homeowners who want to ensure the safety and security of their property. These devices provide a convenient way to monitor your garage and offer many benefits, such as enhanced security, convenience, and peace of mind.

    We have discussed the importance of having a garage door opener with a camera and how this technology has evolved. From early, expensive versions to today’s more affordable and user-friendly devices, garage door openers with cameras have become increasingly accessible to a wider audience.

    Regarding recommendations for readers, consider investing in a garage door opener with a camera if you haven’t already. Look for a device with high-quality video footage, remote access, and easy installation. Keep your device updated with the latest firmware to ensure maximum security.

    Overall, a garage door opener with a camera is a wise investment for homeowners who want to keep their property safe and secure. By providing real-time access to live or recorded footage of your garage, you can rest assured that your home and belongings are always protected.

  • Best Accessories for Table Saw: Power Up Your Table Saw

    Best Accessories for Table Saw: Power Up Your Table Saw

    Table saws are essential power tools for woodworkers and carpenters, allowing them to make precise and accurate cuts. However, using accessories is necessary to optimize the performance of table saws and increase their versatility. This article will discuss some of the best accessories for table saw that can make your woodworking experience more efficient and enjoyable.

    Introduction

    Table saws are versatile tools used to make cuts, including rip, cross, and angled. However, using the right accessories can make all the difference in accuracy, precision, and safety. In this article, we will look at some of the best accessories for table saws that can help you take your woodworking skills to the next level.

    Table Saw Accessories That Every Woodworker Should Own

    A miter gauge is an essential accessory for any table saw. It is a guide that allows you to make precise and accurate angled cuts. A miter gauge is useful for making picture frames, molding, and other angled cuts. Most table saws come with a miter gauge. However, you can also purchase an aftermarket miter gauge with greater accuracy and precision.

    A crosscut sled is another essential accessory for table saws. It is a platform that rides in the table saw’s miter gauge slot and allows you to make accurate crosscuts. Crosscut sleds are particularly useful for cutting small pieces of wood or making repetitive cuts. They are also safer than using a miter gauge for crosscuts.

    A dado blade is a circular saw blade used to make wide grooves in the wood. It is a useful accessory for making joints, such as dado joints, rabbet joints, and groove joints. Dado blades come in different sizes, and you can adjust the width of the cut by changing the number of blades on the arbor.

    A zero-clearance insert is a thin material around the blade to support the cut wood. It helps to prevent tear-out and splintering, resulting in cleaner cuts. Zero-clearance inserts are particularly useful when cutting thin or fragile materials.

    A feather board is a device to hold the wood against the fence or table to prevent it from moving during the cut. It is particularly useful for making narrow or thin cuts. Featherboards come in different sizes and can be attached to the table saw’s fence or table.

    An outfeed table is a table that is placed at the back of the table saw to support the wood being cut. It helps to prevent the wood from falling off the table saw and provides additional support for long pieces of wood. Outfeed tables come in different sizes and can be customized to fit your needs.

    A blade guard is a safety device that covers the blade and prevents accidental contact with the blade. It is particularly useful for beginners still learning to use a table saw.

    Blade Guard Push Stick Dust Collection System Tenon Jig Router Table Attachment Conclusion FAQs What is a miter gauge? What is a crosscut sled? What is a dado blade? Why do I need a zero-clearance insert? What is a feather board?

    A push stick is a safety device used to push the wood through the blade while keeping your hands at a safe distance. It is particularly useful for making narrow cuts or cutting small wood pieces. Push sticks come in different shapes and sizes; some even have built-in magnets to keep them attached to the table saw.

    A dust collection system is an essential accessory for any table saw. It helps to keep your work area clean and free of dust and debris, which can harm your health. Dust collection systems come in different sizes and can be customized to fit your needs.

    A tenon jig is a device that is used to make tenon cuts. It allows you to make precise and accurate cuts, resulting in tight-fitting joints. Tenon jigs come in different sizes and can be adjusted to fit your needs.

    A router table attachment is a device that allows you to use your table saw as a router table. It is particularly useful for making grooves, rabbets, and other decorative cuts. Router table attachments come in different sizes and can be customized to fit your needs.

    FAQs

    • What is a miter gauge?

    A miter gauge is a guide that allows you to make precise and accurate angled cuts on a table saw.

    • What is a crosscut sled?

    A crosscut sled is a platform that rides in the table saw’s miter gauge slot and allows you to make accurate crosscuts.

    • What is a dado blade?

    A dado blade is a circular saw blade used to make wide grooves in wood for making joints, such as dado joints, rabbet joints, and groove joints.

    • Why do I need a zero-clearance insert? 

    A zero clearance insert helps to prevent tear-out and splintering when cutting thin or fragile materials on a table saw.

    • What is a feather board? 

    A feather board is a device used to hold the wood against the fence or table on a table saw to prevent it from moving during the cut.

    Conclusion

    Using the right accessories can make all the difference in accuracy, precision, and safety when using a table saw. From miter gauges to tenon jigs and dust collection systems, plenty of accessories can help you take your woodworking skills to the next level. Whether a beginner or an experienced woodworker, investing in these accessories can help you get the most out of your table saw.

    You may also like these posts!