Staining a board can give it a lovely finish, but getting a consistent layer on both sides can be difficult. We will go over on how to stain both sides of a board and some tips and tactics for staining both sides of a board evenly and quickly in this blog article. We will make sure you have all the knowledge you need to produce a professional-looking finish, from arranging your area to selecting the correct tools.
1. Stain Like a Pro: How to Get an Even Coat on Both Sides of a Board
Staining both sides of a board can help maintain and enhance the inherent beauty of the wood. It is a simple procedure that takes only a few instruments and some time.
Here is a step-by-step tutorial for staining both sides of a board:
- Sand the board: Before staining, sand the board to remove any rough or uneven spots. Smooth the surface with medium grit sandpaper (120-150). Make certain that you are standing on both sides of the board.
- Clean the board: After you have completed sanding, wipe away any dust or debris with a clean cloth or paper towel. To ensure that the stain sticks evenly, start with a clean surface.
- Keep your workplace safe: To protect your workspace from spills and splatters, lay down a drop cloth or plastic sheet.
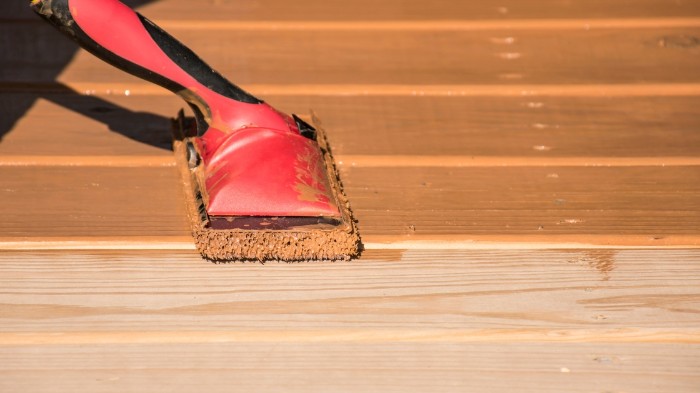
- Apply the stain: Apply the stain to one side of the board with a brush or cloth. Make careful to cover the whole area and work in the direction of the wood grain. Allow for a few minutes before wiping away the excess with a clean towel. Repeat on the opposite side of the board.
- Allow the stain to dry: After staining both sides of the board, allow the stain to cure for at least 24 hours. This will allow the stain to permeate the wood and completely dry.
I. You will require the following tools:
- Sandpaper
- a dry cloth or a paper towel
- Plastic sheeting or a drop cloth
- a brush or a cloth
- Wood staining
You can quickly stain both sides of a board with these simple methods, protecting and increasing the beauty of the wood.
2. Should you stain both sides of the wood?
If the object is visible from both sides, such as a tabletop or shelf, it is best to stain both sides of the wood. Staining both sides ensure an equal color and finish while also protecting the wood from moisture and other environmental elements.
If the wood is not going to be visible from both sides, it may not be required to stain the rear side. If you are creating a bookshelf with the back against a wall, you might not need to stain the back side of the shelves. However, if the wood is exposed to moisture or other external variables, staining both sides is still a clever idea.
In general, taking the time to carefully prepare and finish all surfaces of a wood project is a smart idea to ensure its long-term durability and attractiveness. Sanding, staining, and sealing the wood may be necessary to preserve it from moisture, UV radiation, and other conditions.
3. How do you stain wood evenly without blotchy and dark spots?
When staining wood, you can use the following methods to produce an uneven, blotch-free finish:
- With fine-grit sandpaper, sand the wood evenly and completely. This will aid in the stain’s even penetration of the wood.
- To eliminate any dust or debris, wipe the wood off with a clean, dry cloth.
- Use a clean, soft cloth or a foam brush to apply the stain. Working in the direction of the grain, apply an equal coat.
- Allow the first layer of stain to cure completely according to the manufacturer’s instructions.
- Sand the wood carefully using fine-grit sandpaper to smooth out any rough or uneven places. To eliminate any dust or debris, wipe the wood off with a clean, dry cloth.
- If desired, apply a second coat of stain. Apply an even coat while working in the direction of the grain.
- Allow the stain to dry completely according to the manufacturer’s instructions.
- To preserve the wood and seal in the stain, apply a clear protective finish, such as polyurethane.
When staining wood, by following these techniques and working carefully, you can achieve an even, blotch-free finish.
4. How long does stain need to dry before flipping?
Allow at least 24 hours for the stain to cure before flipping the piece of wood over or handling it. This will allow the stain to properly absorb the wood and dry entirely.
The drying time may vary depending on the type of wood, the humidity and temperature in your work area, and the stain you choose. Some stains may dry more quickly than others. It is critical to read the manufacturer’s label guidelines and adhere to their recommended drying time limits.
If you turn the wood or handle it before the stain has completely dried, you may wind up smudging or spreading the wet stain, resulting in an uneven finish.
Our step-by-step instructions will show you how to stain both sides of a board equally and quickly. We will guide you through the materials, preparation, and application techniques required.
5. How to maintain the stain on a board?
- Clean the board regularly: Dust and grime can accumulate on the board’s surface, affecting the stain’s look. Remove dirt from the board’s surface with a soft cloth or feather duster.
- Protect the board from moisture: Water can cause the wood to expand and the stain to flake or fade, so keep the board dry. Keep the board away from moisture sources like sinks and showers and consider applying a wood sealant to prevent moisture damage.
- Abrasive cleaning products should be avoided: Harsh chemicals and abrasive cleaning products might remove the stain or harm the surface of the wood. Use a gentle detergent or wood cleaner formulated specifically for stained wood.
- Touch up the stain as needed: Over time, the stain may begin to fade or wear away. If this occurs, you can repair the stain by adding a fresh layer of stain to the damaged areas. To guarantee a smooth and even finish, clean and sand the surface before applying the new coat of stain.
- Consider refinishing the board: If the stain has gotten seriously damaged or faded, repairing the board may be essential. This will entail sanding the wood’s surface, adding a fresh layer of stain, and sealing the wood to preserve it from moisture and damage.
6. Conclusion
Staining a board is a simple and enjoyable DIY activity, but it is vital to do it right. By using the strategies and approaches mentioned in this blog post, you will be able to achieve an even and professional-looking finish on all sides of your board.
Whether you are working on a hardwood table, a piece of furniture, or a little craft item, these techniques can help you get the results you desire.