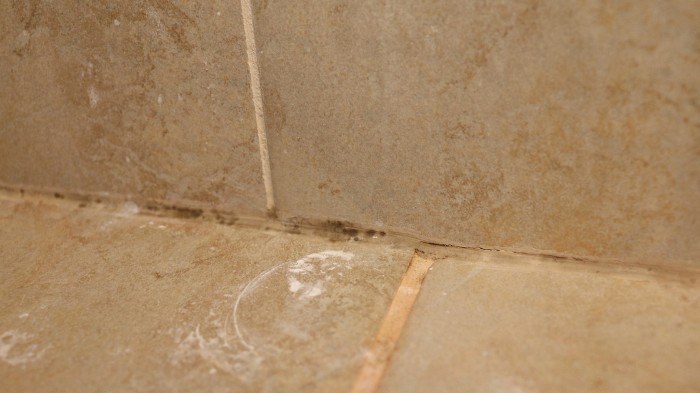
Welcome to our blog on how to grout inside corners! Grouting is a crucial step in the process of tiling a surface, as it helps to seal and protect your tiles and ensure that they last for as long as possible. Grouting inside corners can be a bit trickier than grouting flat surfaces, but with the right tools and techniques, it can be done with ease. In this blog, we will walk you through how to grout inside corners and provide some tips and tricks to make the process as smooth as possible. Whether you are a seasoned pro or a beginner tiler, we hope you will find this guide helpful and informative. Let us get started!
1. Pro Tips for Grouting Inside Corners Like a Pro
Grouting the inside corners of a tiled surface can seem intimidating, but with the right tools and a little bit of patience, it can be a straightforward process. Here is a step-by-step guide on how to grout inside corners:
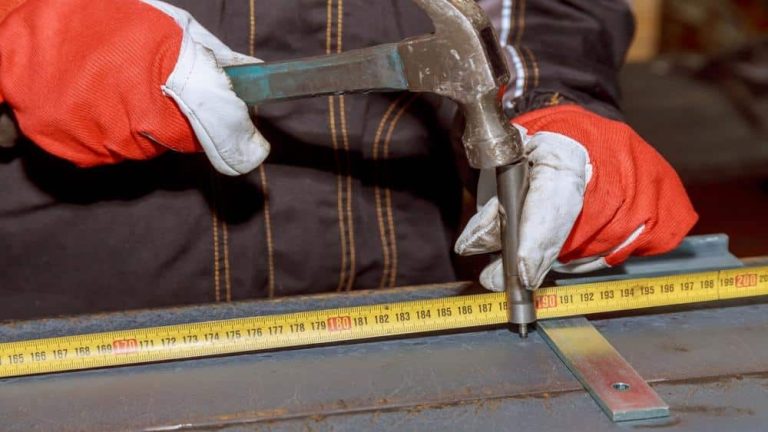
- Gather your tools: To grout inside corners, you will need a few key tools, including a grout float, a grout sponge, and a grout scraper. You may also want to have some rubber gloves, a small bucket of water, and a towel in your hand.
- Prepare the area: Before you start grouting, make sure the tiles are clean and free of any debris. Use a dry towel or a grout scraper to remove any excess grout or dirt from the surface.
- Mix the grout: Follow the instructions on your grout package to mix the grout to the correct consistency. You want it to be thick but still pliable, so you can easily work it into the corners.
- Apply the grout: Use a grout float to apply the grout to the inside corners, pressing it firmly into the joints between the tiles. Make sure to get the grout into all the nooks and crannies and use the grout sponge to smooth it out and remove any excess.
- Clean up: Once you have applied the grout, use a damp sponge or grout scraper to remove any excess grout from the surface of the tiles. Wipe the tiles down with a damp towel, and then allow the grout to dry for the time recommended by the manufacturer.
- Seal the grout: Once the grout has fully dried, you will want to seal it to protect it from dirt and moisture. Use a grout sealer according to the manufacturer’s instructions, and make sure to get it into all corners and joints.
By following these steps, you should be able to grout the inside corners of your tiled surface with confidence. Just remember to take your time, and do not be afraid to ask for help if you need it. With a little bit of practice, you will be a grouting pro in no time!
2. Should you caulk corners before grouting?
In some cases, it can be helpful to caulk the corners before grouting. Caulk is a flexible sealant that is used to fill gaps and prevent water from seeping through cracks or joints. If you have large gaps between your tiles, or if you are concerned about water seeping through the joints, caulking the corners before grouting can provide an extra layer of protection.
To caulk the corners before grouting, you will need to follow these steps:
- Clean the surface: Make sure the tiles are clean and free of any debris before you begin caulking. Use a dry towel or a grout scraper to remove any excess grout or dirt from the surface.
- Cut the tip of the caulk tube: Cut the tip of the caulk tube at a 45-degree angle, and make sure the opening is small enough to fit into the corner joints.
- Apply the caulk: Squeeze the caulk into the corner joints, using a steady, continuous motion. Fill the joints completely and use a caulk smoothing tool or your finger to smooth out the caulk and remove any excess.
- Allow the caulk to dry: Follow the manufacturer’s instructions for drying time and allow the caulk to fully cure before grouting.
Keep in mind that caulking is not always necessary when grouting inside corners. If you have small gaps between your tiles or if the tiles are well-sealed, caulking may not be necessary. In general, it is a promising idea to consult a professional or refer to the manufacturer’s instructions before deciding whether to caulk the corners before grouting.
3. What should you not do when grouting?
There are a few things you should avoid doing when grouting to ensure that the process goes smoothly, and that the result looks professional. Here are a few things to keep in mind:
- Do not mix too much grout at once: Only mix as much grout as you can use within the recommended working time, as the grout will start to harden and become difficult to work with as it dries.
- Do not use too much water: If you add too much water to the grout mix, it will become thin and runny, making it difficult to work with and resulting in a weaker grout joint.
- Do not spread the grout too thin: Make sure to apply the grout evenly and fill the joints completely. If the grout is too thin, it may not provide enough support for the tiles and could crack or break over time.
- Do not rush the process: Grouting can be a time-consuming process, but it is important to take your time and do it right. Rushing through the grouting process could result in a poorly finished job.
- Do not forget to seal the grout: Once the grout has fully dried, it is important to seal it to protect it from moisture and dirt. Make sure to follow the manufacturer’s instructions for sealing the grout to ensure that it lasts if possible.
By following these tips, you can avoid common mistakes and achieve a professional-looking grout job.
4. How long do you let grout sit before you wipe it off?
The amount of time you need to let grout sits before wiping it off will depend on the type of grout you are using and the manufacturer’s recommendations. In general, it is an innovative idea to let the grout sit for about 10-15 minutes before wiping it off. This will give the grout time to set and firm up slightly, making it easier to remove excess grout without disturbing the joints.
After letting the grout sit for the recommended amount of time, you can then use a damp sponge or grout scraper to remove any excess grout from the surface of the tiles. Be sure to use a gentle, circular motion and avoid applying too much pressure, as this could cause the grout to come out of the joints. Wipe the tiles down with a damp towel to remove any excess grout, and then allow the grout to dry for a time recommended by the manufacturer.
It is important to follow the manufacturer’s instructions for drying time, as several types of grouts have different drying times.