If you want to learn how to sharpen a drill bit, you are in the right place. Sharpening drill bits is an essential skill that can come in handy for your DIY projects. Not only that, but it is also a necessary skill for technicians who use drill bits in their projects. With this skill, there will be no need for you to hire someone to sharpen your drill bits. Keeping your drill bits sharp makes your work easier because you’ll not have to spend a lot of energy. To sharpen your drill bit, follow the steps described below.
Reviving a dull metal drill bit is not just a cost-effective solution; it’s essential for achieving high-quality drilling performance. Whether you’re a DIY enthusiast or a seasoned professional, sharpening your drill bits is a skill you must pay attention to. In this comprehensive guide, we’ll walk you through the entire process, ensuring you can cut through steel as if it were butter.
Why Drill Bit Sharpness Matters
A sharp drill bit not only makes your work efficient but also ensures the longevity of your power tools. Using a dull bit forces the drill to work harder, causing unnecessary wear and tear.
Signs of a Dull Drill Bit
- Inconsistent Drilling Speed
- Excessive Heat Production
- Rough, Jagged Holes
- Increased Pressure Required
Choosing the Right Tools for Sharpening
- Bench Grinder
- Diamond File
- Angle Gauge
- Sharpening Jig
Factors to Consider When Choosing a Bench Grinder
Selecting the right bench grinder is crucial to the outcome of your sharpening project. Here are some essential factors to take into consideration:
Wheel Size
The diameter and width of the wheel are pivotal for the tool’s effectiveness. Larger wheels are generally more versatile, offering faster speed and precision.
Motor Power
The grinder’s motor power, usually measured in horsepower or watts, directly impacts its performance. Opt for a motor that can handle the range of tasks you plan to perform.
Speed Variability
A grinder with adjustable speed settings will give you greater control over your sharpening process. It allows you to customize the speed depending on the material you’re working with.
Safety Features
Eye shields, wheel guards, and spark deflectors are essential safety features to look for in a bench grinder. A sturdy base is also crucial for preventing vibrations and ensuring stable operation.
Durability
Choose a grinder made from robust materials like cast iron or steel, which will extend the life of your tool.
Dust Collection
A bench grinder with an effective dust collection system is a plus, as it keeps your workspace clean and enhances the tool’s longevity.
Alternative Tools for Sharpening When a Bench Grinder is Not Available
Sometimes, you might find yourself needing access to a bench grinder. Fear not! Several alternative tools can effectively sharpen your drill bits:
Diamond Files
Diamond files offer precision sharpening and are highly durable. They are ideal for fine-tuning the edges of your drill bit.
Sharpening Stones
Also known as whetstones, these stones come in various grits and can be used both for initial sharpening and honing. They are an excellent manual option but require some skill to use effectively.
Sandpaper
High-grit sandpaper wrapped around a block can be a makeshift sharpening tool in a pinch. There are more efficient methods than this, but they can get the job done for less demanding tasks.
Dremel Tool
Equipped with a grinding attachment, a Dremel tool can serve as a compact alternative for sharpening smaller drill bits.
Angle Grinder
For heavy-duty sharpening tasks, an angle grinder can be an effective tool. However, it’s best suited for larger bits and demands a steady hand for precise results.
By considering these factors and alternatives, you’ll be better equipped to choose the right tools for your drill bit sharpening needs. Remember, the key to effective sharpening lies in both the technique and the tools you use.
The Sharpening Process: A Step-By-Step Guide
Step 1: Preparation
Start by cleaning the drill bit to remove any dirt or rust.
Step 2: Initial Inspection
Examine the drill bit for signs of dullness and damage.
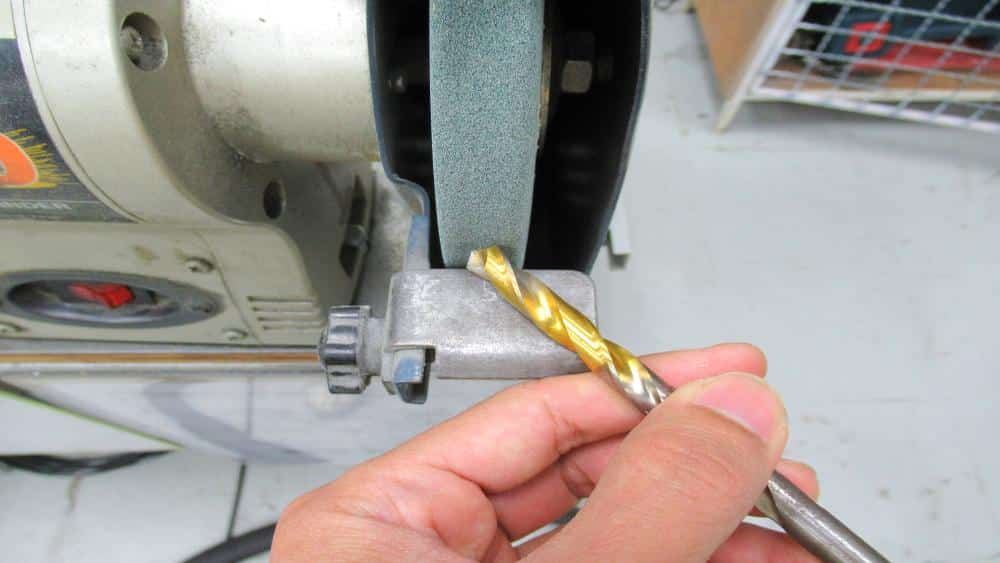
Step 3: Setting Up the Grinder
Place your bench grinder on a steady surface and ensure it’s secured tightly.
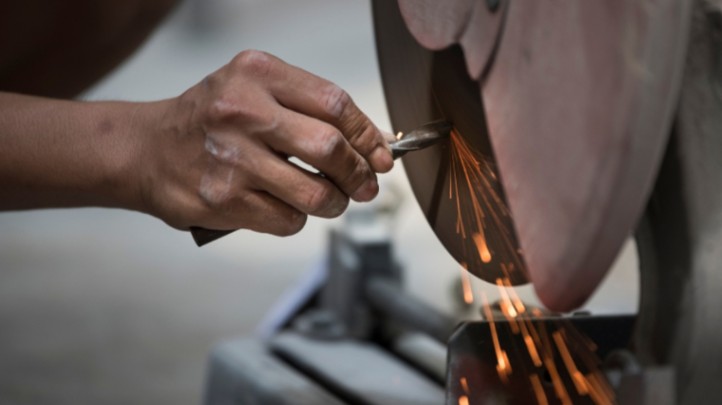
Step 4: Sharpening
Hold the drill bit at a 60-degree angle to the grinding wheel and apply gentle pressure.
Step 5: Final Touches
Use a diamond file for precise sharpening.
Step 6: Testing
Drill a hole in a scrap piece of metal to test sharpness.
Step 7: Additional Fine-Tuning
Repeat the process if the drill bit still seems dull.
Safety Tips for Drill Bit Sharpening
- Always wear safety goggles
- Use gloves to handle the drill bits
- Keep your workspace clean and well-lit
Maintaining Your Drill Bits
Regular maintenance can extend the life of your drill bits significantly. Cleaning after use, proper storage, and routine sharpening are key.
In conclusion, knowing how to sharpen a dull metal drill bit is invaluable for anyone who uses a drill, be it for DIY projects or professional work. By following the steps and tips outlined in this article, you’ll be well on your way to restoring your drill bits to their original glory, capable of cutting through steel as smoothly as butter.
Post-Sharpening Care: How to Maintain the Drill Bit After Sharpening
Sharpening your drill bit is just the start; maintaining its edge is equally important. Here’s how to ensure the longevity of your newly-sharpened drill bit:
Cleaning
After you’ve sharpened your drill bit, it’s advisable to clean it with a mild solvent to remove any residual metal filings or grease.
Lubrication
Apply a light coat of machine oil to protect the metal and keep it from rusting.
Storage
A drill bit’s edge can dull from rubbing against other tools. Store your drill bits in a dedicated case or a holder that keeps them separated and secure.
Regular Inspection
Regularly inspect your drill bits for wear and tear. Early detection of dullness can save you time and effort in the long run.

Troubleshooting Common Issues: Addressing Common Problems Encountered During Sharpening
Even with the best tools and intentions, you might run into issues while sharpening your drill bits. Here are some solutions for common problems:
Uneven Edges
Suppose your drill bit has uneven edges after sharpening. In that case, you may need to adjust the angle or the pressure you’re applying during the process.
Overheating
Too much friction can lead to overheating, which can ruin the temper of the metal. If your bit becomes discolored, you’ve likely overheated it. Consider using a cooling substance like water or oil during sharpening.
Excessive Material Removal
If you find that you’re removing too much material, lighten the pressure and slow down the speed of the grinder.
Not Cutting Well After Sharpening
If the bit still struggles to cut through the material even after sharpening, double-check the angle and alignment. You should refine your technique.
Expert Tips: Additional Insights for Effective Sharpening
For those looking to elevate their sharpening skills, here are some advanced tips:
Keep the Wheel Dressed
Maintain the surface of your grinding wheel by regularly dressing it with a wheel dresser. This ensures a more consistent, cleaner cut.
Use a Jig
A drill-sharpening jig can help maintain the proper angle while grinding, giving you more consistent results.
Light Touch
A lighter touch often yields better results than forceful grinding. It minimizes heat buildup and offers more control.
Frequency Matters
The more you use a drill bit, the more frequently it needs to be sharpened. Please don’t wait for it to become completely dull before your next sharpening session.
Calibrate Your Tools
If you’re using a bench grinder, make sure it’s calibrated, and the wheel is true before you begin sharpening.
By incorporating these post-sharpening care tips, troubleshooting solutions, and expert insights into your routine, you’ll ensure that your drill bits are always in top condition, ready for any project that comes your way.
4. Conclusion
Now that you’ve learned how to sharpen a drill bit, you need to practice what you’ve learned. Hiring someone to do the sharpening costs money, and that’s what you need to avoid. It takes a lot of time and practice to get a perfect grind, so don’t give up. It pays in the long run.
![How to Use a Cordless Drill: Pro Tips and Tricks[Updated]](https://drill-guy.com/wp-content/uploads/2023/09/How-to-Use-a-Cordless-Drill-768x432.jpeg)