For any beginner, amateur, or professional in the area of wood or metalworking, be assured that you will learn effectively how a drill has to be handled. You will be enlightened and grow from the level of skills you possess.
A drill is one of the most popularly used tools in any woodworking project. If you are up to any home remodeling task, woodworking project you can use it as a hand, plumbing, or power tool.
We are assigned the privilege to help anyone interested in woodworking find the right tools to partner with. And also know how to work with them safely and easily. You need to understand how to use a drill driver appropriately. You can learn from guides and articles such as this one and get to the farthest top of your ladder.

1. How to use a drill driver safely — Pre Drilling preparation
There should be some safety measures while using a drill driver, which will protect you from accidents. You can omit these if you are a professional, otherwise, work to ensure safety.
Step 1 – Safe cloth (Optional)
Wearing baggy and loose accessories could cause the drill to stay out of the trial by getting attached to your garment. It may lose grip on your hand and fall off while still running. This could result in a serious injury.
It would be best if you wore a jammed overall that is not too tight or baggy, and that you don’t mind getting dirty.
Step 2 – Mask (Optional)
A mask is designed to help to cover your mouth and nostrils. This is to avoid wood particles from penetrating your respiratory tract and cause complications when breathing. If you drill frequently use a respirator which is a more permanent solution compared to the dust mask.
Step 3 – Goggles for eye protection
Eyes are very sensitive, the minute something gets into contact with our eyes we are fast to rub them. We cannot stand the irritating sensation. To avoid this we advise that you wear glasses for protection.
Step 4 – Ear Protector (Optional)
Wear earplugs or headphones that will prevent ear damage. A handheld electric drill approximately produces 90 decibels enough to cause hearing problems after exposing your ears. Good thing that most cordless drills are not very noisy so, you can use them without protecting your ears.
2. How to use a drill driver — Easy Drilling Process
Step 1 – Choose the right drill bit
Before you use a drill, you must choose the correct bit. A bit that has been created from inappropriate materials will break the bit. Be sure of the drill bit that suits your needs. A masonry bit is good for brick, stone, and concrete drilling.
A general-purpose bit is perfect for drilling any wood material. A drill bit is available for any material you are working on. If you are working on hard materials such as tiles, the glass you will definitely find what is right for you. In most cases, it would be a bit with diamonds at the tip. A high-speed steel bit is right for drilling metallic things.

Step 2 – Put the drill bit into the chuck
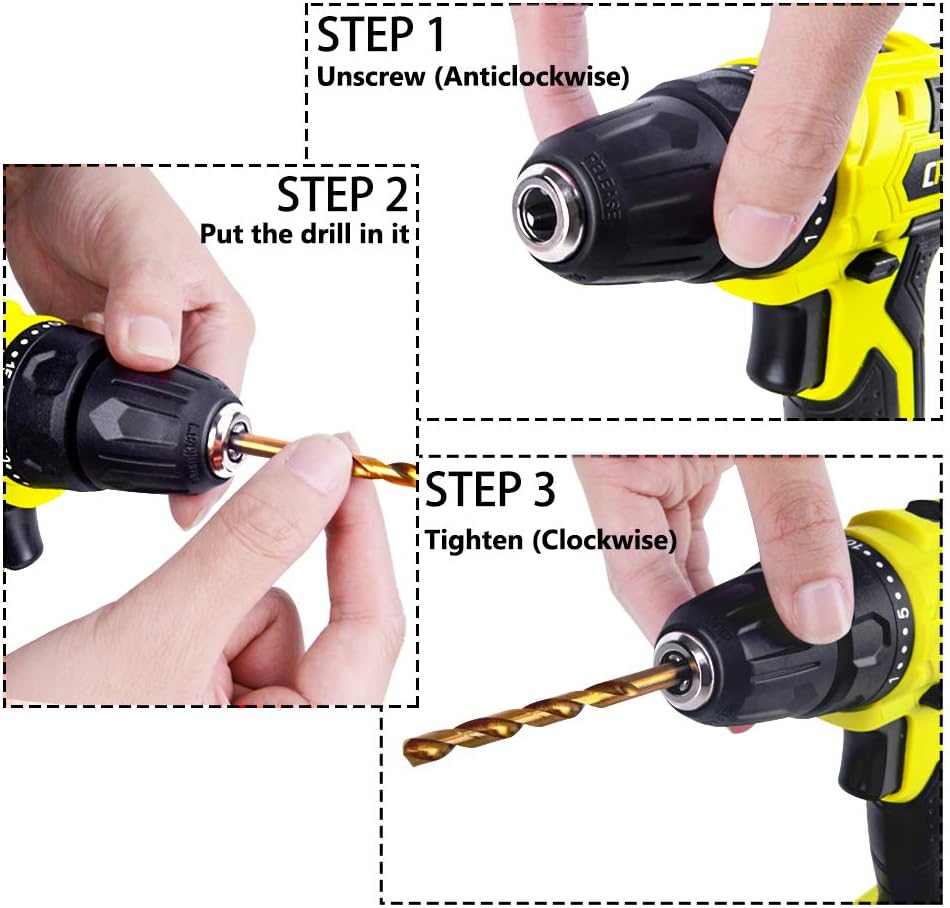
Now that you have identified the right bit, fit it to the chuck of the drill driver when it is unplugged. Follow the steps below:
- Loosen the chuck for easy fitting of the bit.
- Install the bit using your hand. You can also use a chuck key that is found at the top of the machine.
- After installing the bit into the chuck, tighten the bit properly. This ensures that the machine is ready for safe use.
- Test the drill on air by plugging it into the power source. See if it works well If not, make some adjustments.
Also Read: How To Change A Drill Bit — Change Without Any Hassle
Step 3 – Set up the necessary materials
If the materials you are using are not set up, this is where you consolidate them and prepare them for the drilling process. Position the materials you are working on over a sturdy base. You can secure a wood under the workpiece to steady it.
This makes it easy for you while you are making marks and drilling over them. Set the other necessary tools you will use close by for easy reach if you are working alone. You do not want an interrupted drilling session, so setup is crucial
Step 4 – Put small material together
If you are working with a small material, it would be best if you hold the piece together tightly. Find support to the ground and drill it from down that you get sharp, clear, and plug-free holes. You will also sustain no injuries.
YouTube video credit – April Wilkerson
Step 5 – Handle the cord safely
The question that may come to your mind while using the drill is how to hold a drill, For corded, I suggest that you don’t leave it stretched out where you are stepping if you are not using the drill. It is important to note that you should never lift the drill when holding the cord. However, this only applies to corded.
In wet, or muddy areas preferably use cordless drills. If you need to use the cord outdoors, look up the manual and check the recommended wire gauge. Use indoor extension cords or use an adapter to plug a 3-pong cord into a 2-pong outlet.
Step 6 – Drill a pilot hole.
- A pilot hole usually guides the larger drill to the appropriate location of the drill. If you want a plug free drill do the following.
- Mark the place where you desire to drill the hole.
- Drill a couple of closely-spaced holes about 3/16 inch around the perimeter of the cut. This will help you accurately drill through any tough abrasive material.
- Drill into the cut halfway through one side.
- Move to the opposite side of the hole and drill into the cut. The plug will loose and fall off from either side of the hole. For sensitive material, such as glass or tiles, Mark an X, using masking tape at the point where you need the hole. Place the drill bit over the material and gently hammer over it.
Step 7 – Drill with suitable pressure
- Raise the speed of the drill and push in lightly applying pressure.
- Run your drill at top speed with occasional stops to clear off the debris.
- If the pressure you are applying is excessive, it is an indication that you are using the improper bit.
- high speed is effective for woodworking while low-medium speed is effective for steel or hard metal.

Step 8 – Adjust the clutch
Every drill has a twistable collar to make adjustments to the torque, having a series of numbers on it. The more the numbers on the collar the more rotational force the drill will apply.
The rotational force is increased in cases where the penetrating capability is low. Whereas if the force is too high and could damage the material, slower the torque. Markings have shown that the highest torque has a drill bit icon
Step 9 – Do not let the drill bit be overheated
If you are drilling at high speed or through tough materials, it will feel a lot of friction. This causes the drill to overheat to an extent where the drill turns red hot or damages the workpiece.
To solve this, use low-speed at the beginning and increase the speed if the material is hard or it is not running smoothly. At top speeds, ensure that you give slow stops in between to clear off the debris and prevent overheating.
You can use water to cool the bit, by pumping the bit up and down until the water gets to the tip. The water is put in a small clay region surrounding yours to the area flowing into the hole. Give a bit of time to cool then, you can use it.
Step 10 – Never force a jammed bit
Do not force a jammed bit through the material. If the bit gets stuck in the material while drilling, do not try to force it out by starting the drill. You should instead separate the chuck from the bit. Refer to your manual for further understanding and practice.
3. Final Words
I believe that from now henceforth minimal mistakes will take place while using a drill driver. There has been an outline of how to use it safely and hopefully, you have gained more skills.
A drilling machine is versatile and flexible for use in home improvement, construction, and interior design. If there is a tool that will give you the best results with the proper management.
Consider getting one of these if you are a DIY enthusiast, a professional, or a homeowner. The drills are smooth and clean, making fixing screws easy as pie.